Saturday, December 29, 2007

Freeware Appreciation Day: ClipX

Summary: ClipX is so much more than your regular Windows clipboard.

This month, my Freeware Appreciation Day's contribution goes to ClipX.

ClipX is a clipboard history manager written by Francis Gastellu. This tiny application keeps track of text- and image-based clipboard entries allowing you to paste items, which have been recently copied to the clipboard, but got overridden by more recent entries. ClipX also makes it easy to strip formatting from rich text- or HTML-formatted values and paste resulting plain (i.e. unformatted) text in a single step.


Since I have already explained how ClipX works and described how to correct a minor problem with its hotkey settings in the ClipX fix post, I'll keep this entry short. If you need more information, check out what other people say about ClipX:
Review by BestFreeApps
Ricky's Web Review
I have been using ClipX for a few years now and it saved me a lot of keystrokes. Unfortunately, it looks like development work on ClipX has been halted (there have been no updates to the application since late 2005), but since it keeps working, I feel that the author deserves a small token of appreciation (I hope, though, that ClipX keeps working until Microsoft wakes up and makes the same functionality built into the operating system). If you haven't used ClipX (or an alternative clipboard manager), give it a try; I'm sure you'll like it.

[UPDATE: After publishing this post, I've noticed articles covering ClipX in a number of prominent blogs, including Coding Horror, Lifehacker, and MakeUseOf. Also, Francis Gastellu released a new beta, so we may get a new version of ClipX very soon.]

Friday, November 30, 2007

What to do with a broken laptop

Summary: Get the best out of your broken laptop.

When my four-year-old Dell Inspiron 8500 died, I wondered if it would make sense to get it repaired. After ruling out easy fixes (replacing battery, A/C adapter, power cord, RAM, hard drive), my only option was to turn to a laptop repair service. Because I did not want to waste $70 on a repair estimate to learn that I needed to spend $400 more to replace the motherboard (I suspected the motherboard to have failed), I ended up selling the laptop to the nice folks at LaptopService for $175 (minus the $15 cost of shipping). Now, $160 may not sound much, but it was more than what I would've gotten from the broken laptop sitting in a closet.

If your laptop breaks and you're not sure what to do with it, this is what I would recommend (the following recommendations are based on the assumptions that your laptop is not covered by a warranty and you do not have a technically savvy friend, who can help you fix it):
  1. Understand the problem
    Before attempting corrective actions, try to figure out what is wrong with your system. Search Google for the symptoms you're seeing (tweak your search query to get the most comprehensive results). Visit newsgroups (forums) which discuss the same (or similar) model, as well as laptop repair sites, such as Laptop Repair Help (I found this site particularly useful). Most, if not all, laptop manufacturers provide forums where users exchange information and help each other troubleshoot problems. You can also find helpful links at the Satisfaction web site. If nothing helps, try your luck with the manufacturer's customer service; although you will not get a free repair (unless it falls under a recall), you may get free troubleshooting tips (I once got accurate diagnosis from a Dell customer service representative for an out-of-warranty system).
  2. Fix simple problems yourself
    If you determine that the problem is caused by a bad power supply, hard drive, memory module (RAM), or some other easily replaceable part, you should be able to buy a replacement unit for little money and change it yourself. If you have never changed any parts inside of a laptop (hard drive, RAM), you will find that it is not as complicated as it may seem. To make sure you do it right, find the manufacturer's instructions for your laptop model (if the instructions are not in the manual, you should be able to find them on the manufacturer's Web site). To get a general idea what a particular operation involves, search the Internet for videos or step-by-step instructions. For example, this C|NET video will give you a general idea of what it takes to replace a hard drive. Good sites to include in your search include Instructables, eHow, and Wonder How To.
  3. Contact a laptop repair professional
    If you cannot determine the root cause of the problem or repair the laptop yourself, consider sending it to a repair shop, but first figure out whether the laptop is worth repairing. If you bought the laptop for $600 four years ago, it would not make sense spending more than $150 on fixing it, because you can get a brand new and better system for less than $400. If you do not have a local laptop repair shop, check the ones available online. Some online shops offer free shipping and/or estimates, but I'm not sure what happens if you send your laptop for an estimate and find out that the repair is too costly; I doubt that the shop send you the unit back for no charge, but I may be wrong (ask before shipping the laptop).

    IMPORTANT
    Before sending your laptop to a local or online repair shop, remove all personal files from the hard drive. If your laptop does not work at all, but you have another one, you may be able to temporarily switch the hard drive in a good laptop with the drive from the broken one and once you boot the system up, use tools that permanently erase files, such as a free Eraser or CyberShredder (the regular Windows Delete command does not actually erase files). Alternatively, you can reformat the hard drive, but doing so will erase all data. If you do not have another laptop, you may be able to buy a cheap hard drive enclosure for around $10 [make sure you get it for the right size; most laptops use 2.5" hard drives]. Don't forget to put the hard drive back.

  4. Sell broken laptop
    You can try selling the broken laptop on Craigslist, eBay, or another online auction; just make sure you clearly explain what is wrong with it (be honest, don't repeat the story of Amir Tofangsazan). Another option would be to sell it to a local or online repair shop, such as:

    1HideOut
    CashForLaptops
    Jay Brokers
    LaptopRepair
    LaptopService

    After getting an offer, I shipped my laptop to LaptopService with a copy of the estimate. A few weeks later, I started getting worried, because I did not get a confirmation e-mail or any indication of delivery. To make matters worse, I managed to lose the estimate, the quote number, and the shipping receipt. Fortunately, after a few more weeks, I finally got the check. While I would recommend LaptopService, I cannot vouch for other shops. If you get an acceptable offer, check if the shop has any unresolved complaints at Better Business Bureau. Keep all communication and other relevant records in place and use registered mail (or proof of delivery) in case something goes wrong. Again, do remember to erase sensitive files from the hard drive before shipping.
  5. Sell laptop parts
    If you cannot sell the laptop as a whole, try selling it by parts (RAM modules, hard drive, accessories, etc.) on Craigslist or eBay. When selling laptop parts, make sure that they work (to verify that the parts work, you may need to plug them into a working compatible laptop). Before selling the hard drive, reformat it.
When you are ready to get a new laptop, remember that it can also break. To protect your investment and make it easier to recover losses, follow these advices:
  • Use the right credit card
    When buying a laptop (or some other expensive item), use a credit card which extends product warranty. Keep in mind, that credit cards only extend the regular warranty. For example, Visa and MasterCard can extend a typical one-year laptop warranty to two years, but if you buy an extended three-year protection plan from the store (or elsewhere), credit cards will not double it. Find out the details of the credit card's extended warranty benefit to avoid unpleasant surprises. And save the documentation that may be requested by the credit card, such as purchase receipt, manufacturer's product warranty card, etc. Do not cancel the credit card, until the extended warranty coverage expires.
  • Don't throw away stuff; keep it clean
    Don't throw away the laptop package (box), accompanying documentation (user guide, warranty card), media (software CDs or DVDs), and accessories. If the laptop breaks and you decide to sell it, you may get a better offer if it's in good cosmetic condition and comes with all items in the original package.
  • Use a laptop cooler
    Overheating causes many laptop problems. To avoid overheating, use a laptop cooling pad, which you should be able to find one on sale for around $10 (read this tip).
Additional references:
The DIY guide to PC troubleshooting and repair

Saturday, November 17, 2007

Freeware Appreciation Day: KeePass Password Safe

Summary: Use KeePass Password Safe to store your passwords, account information, and other sensitive data.

In response to Jeff Atwood's call to support small software vendors, I decided to institute a personal Freeware Appreciation Day on which I will contribute to one of my favorite freeware makers. I will try to observe the Freeware Appreciation Day on a monthly basis until I run out of money or cover all of my favorite applications (I hope that neither of these will happen).

This month's contribution goes to KeePass Password Safe, an OSI-certified, free, open-source, light-weight, and easy-to-use password manager created by Dominik Reichl. Before picking KeePass, I checked a few similar utilities including commercial Password Plus, SecureSafe Pro, RoboForm2Go, IBM/Lenovo hardware-dependent Password Manager, as well as free, open source Password Minder and Password Safe, but I liked KeePass most.

KeePass is portable (i.e. you can run it from a USB drive) and very easy to use. It keeps your information in a data file (database) encrypted with a user-defined password. You must specify this password in order to open the data file when starting the application or if you want to open a different data file.


Once you open the data file, KeePass displays the information about your user accounts (or whatever you saved in it) grouped by categories.


When adding or updating an entry, you can specify the title of the entry, your user name, the URL of the site (I wish that the URL were displayed before the user name), password, notes, and other information. There is an option to attach a file to a password (account) record, but I haven't tried it, yet.


The grouping feature allows you to organize your records in a logical manner. You can add and delete groups, or move items from one group to another. If you forget in which group you stored an item, you can search for it using the Find dialog box.

The basic functionality of KeePass should satisfy most users, but it can also be extended via plug-ins. For example, you can use plug-ins to export passwords to a comma-separated text file, import passwords from Firefox, open Web sites and fill in the login data automatically, and do more.

If you decide to use KeePass, you may need to figure out how to keep your data file in sync between multiple computers. One option is to keep the file on a USB drive (you can either open it from a USB drive or use the USB drive to copy it between machines). Although the file is encrypted, you will feel safer if you use the drive's built-in encryption or tools such as TrueCrypt.

If you do not like an idea of carrying data files on a USB drive, consider using a Web-based service, which allows you to map your personal online storage as a local drive, such as Who.HasFiles or GmailFS. If you store your data file online, remember to keep a backup copy in case the service goes down.*

UPDATE: To synchronize your KeePass data file across multiple computers (and keep online backups), try the DropBox synchronization tool. Dropbox worked very well for me, but there are also other alternatives, such as Syncplicity and SpiderOak. Or instead of using KeePass, try the online-based LastPass; it offers most -- if not all -- features of KeePass, and even more (it also lets you import the data stored in the KeePass data file).

Additional references:
Wikipedia: Password Manager


*Although keeping data files on a USB drive or online are both viable options, it would be more convenient to use a Web-based password manager. In fact, several online password managers popped up recently. After trying a few of them, Clipperz and Passpack seemed most advanced to me. Unfortunately, they both have limitations. Passpack has a difficult-to-use two-password authentication scheme, and, what is worse, it limits the size of the password database to 128 KB (approximately 150-200 records in a free account), while Clipperz is yet to implement the importing feature; Clipperz v. Passpack, Round 2 offers a good comparative review of both services. I'm looking forward to using a Web-based password manager, but until these services mature, I'll stick to KeePass. NOTE: See the update note.

Saturday, November 3, 2007

A tale of two laptops, or can I run Vista on a Celeron

Summary: Does it make sense to buy a low-end laptop for about $400 or should you look for a more advanced and more expensive system? Find out what you can expect if you get a cheap Celeron-based laptop and run Vista on it.

About two months ago I replaced two family laptops with the cheapest systems I found at the time: a $380 Compaq Presario (model C563NR with Celeron M 520, 512 MB RAM, 80 GB hard drive, CD-RW/DVD-RW with dual layer support, 15.4" screen)


and a $350 Toshiba Satellite (model A135-S4656 with essentially the same parameters).


The major differences between the two systems (other than the price) include the screens (the Compaq is glossy, the Toshiba is matte), the Compaq's LightScribe support, and the Toshiba's built-in memory card readers. Because both laptops came with Windows Vista (the Home Basic edition), I knew that the supplied 512 MB of RAM would not be enough. I was also a bit worried about Celeron's ability to handle Vista, so I considered wiping it out and installing XP, but after upgrading RAM to 1.5 GB (I bought a couple of 1 GB modules for around $25 per each after rebates), I decided to give Vista a try. This is what I can say about these two systems after using them for a few weeks.

First of all, I have to mention that I'm not a primary user of these systems -- my wife and daughter are -- but I spent enough time with them to form an opinion. Second, we do not use these laptops for computer gaming, video editing, 3D modeling, and other types of resource-intensive applications, but for the most typical tasks -- web browsing (Firefox with a bunch of add-ins, IE with some extensions), photo editing (Adobe Photoshop Elements 2.0, Microsoft Digital Image Suite), instant messaging (ICQ, Skype), document editing (Microsoft Office 2007), listening music and watching videos (Windows Media Player) -- they work quite well.

I did not expect these cheap Celeron-powered laptops to be particularly fast, but it seems to me that for the types of applications we use them, they run on par with my brand new Core 2 Duo-based work desktop with 3 GB of RAM, which by the way is still running XP. [I think that my work PC underperforms because of all of the IT-installed crap; it is just a theory, though.] And despite my worst fears, Vista did not cause any major headaches. I downloaded Vista-supported drivers for all of my gadgets (printer, camera, routers, modems, etc), except for an older Logitech QuickCam Zoom webcam. For some reason, Logitech refused to support this webcam on Vista, but fortunately, I found a workaround. I have not used my Canon Pixma MP450 scanner, yet, so I can't say whether it works on Vista. [UPDATE: The scanner works fine.] And the software that accompanies Longman Dictionary of American English seems to have issues with video and audio, but I'm not sure if they are related to Vista or QuickTime (I've received a few suggestions from the vendor, but they did not help; not a big deal, though). Other than that, Vista works fine. I even started to like it.

I know, these days it is not cool to say anything good about Vista, but I really think it's not that bad. Notice that I use the Home Basic edition, so I do not see the fancy Aero interface (I would not dare to run Aero on a low-end laptop), but even without it, it seems slicker than XP. Of course, it's not perfect, certain things could've been done better, but it's not as bad, or problematic, as I expected it to be. So, I'm sticking with Vista for now. By the way, my wife and daughter did not seem too excited about using Vista, but when I recently asked them if they would like to switch back to XP, they both said no.

Getting back to laptops, I'm happy to say that they exceeded my modest expectations. Keep in mind that I increased memory by 1 GB and removed most of the pre-installed bloatware, including Norton anti-virus suite, which I replaced with Avast! (I'm a huge fan of the lesser known anti-virus products). I like the Compaq's glossy screen, but the Toshiba's overall design is more visually pleasing. I also like the Toshiba's built-in memory card readers, although I'm disappointed with the absence of a Compact Flash reader. The keyboard layout on the Compaq seems more logical and the Compaq's LightScribe support is a nice bonus (although I'm too cheap to buy LightScribe media).

Because the Toshiba was about $30 (or 8 percent) cheaper than the Compaq, it gave me the best bang for the buck, but I have no problem recommending either of these two models or their successors, although I would also recommend upgrading RAM to at least 1.5 GB if you're planning to use Vista (memory upgrade is a trivial operation, which does not require any technical skills). If you are not sure if a Celeron-based system will be sufficient for your needs, it probably will (people who know that they need a stronger processor can normally explain why). If you're still hesitating, do your research, but don't listen to those who just say that Celerons suck; the first generation of Celerons may have sucked a bit, but the latest models work just fine for an average user. Of course, you can add $100-$200 more and get a Pentium or Core-based system, but if you use this laptop for anything other than the most demanding tasks (such as games, 3D/video editing, etc), you will probably not notice the difference.

Additional references:
Tech Review: Intel® Celeron® M processor 520

Wednesday, October 17, 2007

Good-bye favorites, hello del.icio.us

Summary: Learn how you can keep your bookmarks and favorites synchronized between multiple browsers and computers.

UPDATE: Recently del.icio.us changed the name (and URL) to Delicious.

If you don't know how to keep your Internet bookmarks (or favorites) synchronized across Web browsers and computers, stop whatever you are doing and check out del.icio.us (pronounced delicious, as in delicious dinner). Don't mind a weird name (and even more weird spelling), del.icio.us (recently acquired by Yahoo!) is a very capable service, which can end your browser synchronization hassles. Although other services offer the same (or similar) functionality, I like del.icio.us because it meets all of my bookmark synchronization needs.

I use two Web browsers -- Firefox and Internet Explorer (IE) -- on several computers, at work and at home. Firefox is my primary browser, IE is secondary. [I use IE because some sites -- in particular, certain enterprise applications I use at work -- only work in full-blown IE, even the IETab extension does not help.] My computers run Vista and XP. I have unrestricted access to the Internet from home, but corporate firewall rules do not allow connection to some social networking sites at work and when using VPN.

Based on these assumptions, I expect a bookmark synchronization service to do the following:
  1. Support IE and Firefox
    I don't care about Opera and other browsers at this point.

  2. Support multiple computers
    It must synchronize bookmarks on at least three computers.

  3. Work on Vista and XP
    Because I use different operating systems, it cannot be Vista- or XP-specific solution.

  4. Respect corporate firewall policies
    Although these policies can change, the bookmark synchronizer must at least work within the most common limitations.

  5. No additional hardware
    Having to carry software or data files on a USB drive is too much hassle.

  6. No manual operations
    There should be no need to start bookmark synchronization jobs. All work must be done transparently to the user.

  7. No new browser toolbars
    Please, no more browser toolbars. I would not mind having to install a browser extension, but its functionality should not be dependent on a whole new toolbar. Context menus, additional menu options, new buttons added to existing toolbars, and an optional toolbar providing enhanced functionality, are fine, though.

  8. Web-based access to favorites
    Bookmarks must be accessible from any computer without dependency on special software (extensions/add-ons). This feature would allow accessing bookmarks on someone else's computer, e.g. in a public library.

  9. No need for a personal server
    Some bookmark synchronizers require a personal FTP server; not everybody has one.

  10. Must be free
    I do not mind commercial software, but free is better.
Before trying del.icio.us, I tested a number of free browser synchronization services, such as BookKit and Zinkmo. Unfortunately (or fortunately), I could not make them work. [It has been a while, though, so they may have improved since then.] My other idea was to use the PlainOldFavorites extension in Firefox and keep IE favorites in sync between computers with the help of FolderShare, but because the corporate firewall blocks access to FolderShare and I did not find a comparable provider, I had to abandon this approach, too.

After spending a lot of time and getting nowhere, I finally decided to try social bookmarking. I considered several services including Google Bookmarks, Yahoo Bookmarks, Windows Live Favorites, and others, but I liked del.icio.us best. [I became particularly interested in del.icio.us after reading an interview with its founder Joshua Schachter published in Founders at Work: Stories of Startups' Early Days, which, by the way, is a fascinating book.]

Del.isio.us is free, but to use it you must first register to create an account, which will hold your personal preferences and favorites. After registering, open Firefox and install the del.icio.us Bookmarks add-on. If you use IE, open it and install the del.icio.us Buttons extension.

Both extensions add two buttons to the browsers' toolbars: Search (the one that looks like a four-square chess pattern) and Bookmark (or tag).

The Search button gives you access to your saved bookmarks. It functions differently in Firefox and IE. In Firefox, the Search button opens bookmarks in a sidebar. In IE, it opens bookmarks in the current window (tab), which is not the best approach, but since I do not use IE often, I can live with it. The Bookmark button, allows you to bookmark a current page. When you click this button, del.icio.us opens the Add Bookmark dialog box, where you can override the bookmark name, enter notes, and assign tags. In some cases, del.icio.us will suggest tags for you, but you can always add your own (more on tags later).

In addition to the Search and Bookmark buttons, the Firefox extension also installs a new toolbar and a new main menu item. I don't see the value of the toolbar, so I always hide it in the browser (by unchecking the View-Toolbars-del.icio.us Toolbar menu option). The menu contains shortcuts to common operations, such as Add Bookmarks, Your Bookmarks, Manage Favorite Tags, How Do I Use This, and others. In IE, you can only access these features on the Web from your del.icio.us account page.

Before switching to del.icio.us, I was a bit cautious about deviating from a traditional hierarchical structure of Firefox bookmarks and IE favorites, but once I started using tags, I loved them. Tags make it easier to classify, manage, and find bookmarks. For example, say I want to add the Microsoft [Designs the] iPod [Package] link to my bookmarks [if you haven't seen this video, it's quite funny]. If I were to use traditional bookmarks, under which folder should I save it? Should it go under Video? Microsoft? Humor? Something else? And will I remember the folder under which I save the bookmark? Del.icio.us' tag-based approach solves these problems. You just define Video, Microsoft, Humor, or whatever seems appropriate, as the bookmark tags, and you can can navigate to the bookmark by drilling down the tag tree starting from any one of them. For example, you can go Video-Humor-Microsoft, or Video-Microsoft-Humor, or Humor-Microsoft-Video, and so on.
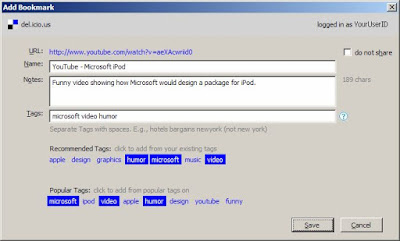
Del.icio.us makes it easy to add, rename, delete, and assign tags. Once you make the change, it will be immediaely reflected in the bookmark navigation tree. In addition to tag-based navigation, you can search for specific words in the bookmark names, check the most recently added bookmarks, and use other search and browsing techniques.

When you bookmark a page, by default, del.icio.us shares your bookmark with the community; use the do not share check box to keep the bookmark to yourself.

Del.icio.us allows you to import Firefox bookmarks and IE favorites, although I did not try this option. You can also export bookmarks from del.icio.us, in case you decide to use a different service.

I haven't looked closer at other bookmarking service, but most of them should be comparable, and maybe even better, than del.icio.us (they sure have better names), but if you haven't picked one, yet, try del.icio.us and you will never want to go back to your old bookmarks... or favorites.

P.S. If your primary browser is Firefox, in addition to del.icio.us, I also recommend installing the Google Browser Sync extension. It can help you sync the toolbar buttons, persistent cookies, history, and other settings between different computers. Thanks to Amith for the recommendation.

Additional references:
Browser synchronizers
Create custom bookmarks of your favorite web sites using only2clicks
Keep Your Bookmarks Organized Online with Quick Bookmarks
Sync bookmarks between IE and Firefox

Tuesday, October 9, 2007

Can a man change?

Summary: How can you improve efficiency of an organization? Hire great employees. Fire bad ones. But, first check out the references mentioned in this article.

Madame de Merteuil:"You are an awful man."
Monsieur de Valmont:"Do you think a man can change?"
Madame de Merteuil:"Yes. For the worse."
From "Valmont"

In the article The causes of greatness, Bob Lewis explains what makes an organization great focusing on the value of people. The article offers several astute observations, but the main idea can be summarized in the following statement:
"[I]f you want an organization that works, you'll get more leverage from hiring great employees than from any other single effort you can undertake."
Among high-tech companies, Google understands the importance of hiring quality workers better than most. In case you haven't heard about Google's hiring philosophy, it's based on two simple rules:
  1. Only hire candidates who are above the mean of your current employees;
    and
  2. There is no hiring manager.
Peter Norvig, Director of Google Research, explains how this approach helps Google address the shortcomings of traditional hiring practices:
"Whenever you give project managers responsibility for hiring for their own projects they'll take the best candidate in the pool, even if that candidate is sub-standard for the company, because every manager wants some help for their project rather than no help. That's why we do all hiring at the company level, not the project level."
Google's hiring philosophy seems to pay off (at least, if you believe Google employees who like to brag how smart their co-workers are); unfortunately, it is not that common. Most companies make their hiring decisions under the following premises:
  1. If you do not hire someone today, your open req* may be gone tomorrow (due to cost saving initiatives, reorganization, outsourcing, etc).
  2. Considering the previous statement, don't waste time searching for the best candidate; just pick the first applicant, who seems to fit the job description.
Organizations operating under such premises tend to underestimate the implications of bad hiring decisions because they succumb to a couple of fallacies.
Fallacy #1: Bad workers will do a good job if they follow an approved process/methodology/procedure (CMMi, XP, Agile, SCRUM, etc).
This belief is based on the assumption that processes are more important than people. Those who hold this belief think that any organizational problem can be solved with the help of a good process.

While processes have their place in the organization, managers tend to overestimate their value because relying on processes gives them a (false) sense of control. If your organization is not effective, it is comforting to believe that once you adopt a new process, things will change to the better. If you admit that bad employees are at the root of your problems, you will have to confront people and either make them change or control their behavior, something good managers do not enjoy doing.

The good news is that certain processes adopted by software development teams can reduce the number of problems caused by bad developers. Juval Löwy once wrote:
"Rapid development tools will make bad developers worse, because they allow them to produce bad code faster."
Likewise, by introducing certain bureaucratic overhead, processes can make bad developers less bad, because they will force them to produce bad code slower. However, if you're stuck with mediocre developers, no process will make your organization sufficiently effective. If you agree with Steve Yagge, who suggested that
"Bad developers, who constitute the majority of all developers worldwide, can write bad code in any language you throw at them,"
you should agree that bad developers can write bad code under any process you throw at them. This brings us to the fallacy of personal improvement.
Fallacy #2: Certain measures -- such as effective supervision, mentoring, a development plan -- can turn bad workers into good workers.
I'm not questioning a possibility of human self-improvement, but I cannot seem to recall a single case of a bad worker turning good. I have witnessed good workers becoming better, average workers staying about the same, but bad workers tend to remain bad.

Some bad workers do not improve because they don't even understand that they are bad (or how bad they are). Cornell University researches conducting the Unskilled and Unaware of It study concluded:
"When one fails to recognize that he or she has performed poorly, the individual is left assuming that they have performed well. As a result, the incompetent will tend to grossly overestimate their skills and abilities." (read the review)
The study suggests that people can be trained to "recognize the limitations of their abilities," but what about actual working skills, such as ability to write software? According to the findings of A cognitive study of early learning of programming, most people can't be taught programming. Nevertheless, many of those who can't learn to program somehow manage to get Computer Science degrees and eventually get programming jobs.

So what's a manager to do? To paraphrase Bob Lewis,
"If you want an organization that works, you'll get more leverage from firing bad employees than from any other single effort you can undertake."
This may sound harsh, but for organizations which do not invest in a rigorous -- a'la Google -- hiring procedure, getting rid of bad workers (not necessarily via layoffs) may be the most effective method of achieving efficiency. I'm not advocating such draconian measures as Jack Welch's annual firing of the bottom 10% of his managers (although, if implemented correctly it could be quite effective), but getting rid of people, who cannot do their job, is essential to the health of the organization. If you are interested in better ideas, read the references below.

Additional references:
How Do You Find the Best Employees for Your Company?: Things that do not help in hiring great developers.
Done, and Get Things Smart: How do you find great employees?
A Field Guide to Developers: What it’s going to take to be a top choice for top developers.
A holiday card to the industry - 2007: People, process, and technology: it's a simple formula that describes what makes any business operate.
Converting Capital Into Software That Works: A software company has to think of recruiting the right people as its number one problem.
Finding Great Developers: You can receive thousands of job applications and never see a great software developer.
Hazards of Hiring: Eric Sink offers guidelines for handling tough hiring decisions in a small ISV.
Google: Ten Golden Rules: How Google gets the most out of knowledge workers.
Hitting the High Notes: The lagniappe that you get from the talented software developers is your only hope for remarkableness.
How Google woos the best and brightest: Going from 150,000 resumes per month to 9 hires per day.
Interviewing with Google: Benji Smith shares first-hand experience with the Google interviewing process.
Iz.I.T.4.V.S.P: Suggestions how Intel should handle redeployment (layoffs).
News: Analysis of the "we hire the top 1%" claims.
No Matter What They Tell You, It's a People Problem: Usually the things that make or break a project are process and people issues.
Separating Programming Sheep from Non-Programming Goats: There are two populations: those who can program, and those who cannot.
Sorting Resumes: Looking for negative clues in resumes.
The Guerrilla Guide to Interviewing: Don’t hire people that you aren’t sure about.
Whaddaya Mean, You Can't Find Programmers?: How to find people and convince them to work for you.
Why Can't Programmers... Program?: 199 out of 200 applicants for every programming job can’t write code at all.

Bonus:
Employees Fight Abusive Supervisors with Lower Productivity: Researchers have quantified the ways employees quietly fight back despotic supervisors.


*Open req is a corporate slang for an open requisition (position).

Tuesday, September 11, 2007

From real Steve to fake Bill

Summary: A few bits of entertainment and knowledge related to Apple and Microsoft, Steve Jobs and Bill Gates.

If you're following the buzz surrounding Steve Jobs and/or Apple (iPhone price cut, rebates, etc), you may enjoy the following articles:

The Puppet Master: Love Steve Jobs or hate him, just don't ignore him by Robert X. Cringely (interesting)
Dear early iPhone adopters: Yeah, we f****d you by "Fake Steve Jobs" (funny)
Larry's bold idea by "Fake Steve Jobs" (funny)

Not to be forgotten, here is your weekly dose of (well-deserved, yet good-natured) Microsoft mockery:

Channeling Microsoft Execs by John C. Dvorak (funny)

And a twist of iPod vs. Zune humor:

California by Joel Spolsky

Tuesday, September 4, 2007

Installing a Windows service on Vista

Summary (for developers): If your Windows service fails to install on Vista, these tips can help you correct the problem.

UPDATE: For information about implementing Windows services in Visual Studio 2008 (issues, solutions, and downloads), check my Implementing Windows Services in Visual Studio 2008 post.

A couple of years ago, I wrote an article* explaining how to simplify implementation, debugging, and installation of Windows services written in C#. The approach described in the article worked for me very well, but recently I ran into an issue related to Windows Vista. I'm not sure whether it's a problem with Windows Installer (AKA Microsoft Installer, or MSI) or Visual Studio, but for some reason, the installer cannot install Windows services from Visual Studio-built MSI files when User Account Control (UAC) is enabled. In this post, I'll explain how to correct this problem and build a Windows service installer, which works on Vista, as well as pre-Vista versions of Windows (XP, Windows Server 2003, etc).

[Disclaimer: To install a Windows service, I use a custom actions (CA) implemented in a ServiceInstaller-based class. Some MSI gurus do not recommend this approach; however, this seems to be the direction currently advocated by Microsoft. If you can suggest a better option, please submit it in a comment.]

UPDATE: A better alternative to using custom actions (CA) implemented in a ServiceInstaller-based class, would be to define the Windows Service-related entries directly in the MSI package. Although, I'm not sure how to do this using Visual Studio Installer, it is rather trivial to do in WiX. For more info on WiX read my three-part series.

Windows service installation is a privileged operation which is restricted to administrative accounts. To install a Windows service on Vista (with enabled UAC), you can use one of the following methods.

Option 1: Disable UAC (not recommended)
You will probably not want to do this; at least, not for the sole purpose of solving the installation problems.

Option 2: Execute msiexec.exe as Administrator (not recommended)
This option is rather inconvenient because there is no shortcut to launch msiexec.exe as Administrator. You must also enter all command-line parameters passed to msiexec.exe by hand.

Option 3: Launch the installer using a bootstrapper (not recommended)
According to Jonathan Wells, a product manager for Visual Studio,
"Windows Vista heuristically detects installation programs and requests administrator credentials or approval from the administrator user in order to run with access privileges. So applications called "setup.exe" and "install.exe" will prompt for administrator credentials (if running as standard user) or approval (if running as Administrator). If you do not desire this behaviour then include a manifest with your application."
This option is not recommended for a number of reasons. First, it requires a bootstrapper file to be deployed along with the MSI file. Second, the bootstrapper will need a manifest specifying the right requestedExecutionLevel (notice that you can embed manifest in the executable). Finally, depending on the policy configuration, installer detector responsible for determining whether a process is an installation program can be disabled (see the Installer Detection Technology section in
Understanding and Configuring User Account Control in Windows Vista).

Option 4: Fix the MSI file (recommended)
If I understand it correctly, the problem is caused by the wrong value defined by Visual Studio for the service installer's custom action type. If you open the MSI file in Orca and look at the contents of the CustomAction table, you will see (among other records) three entries corresponding to the Install, Uninstall, and Commit custom actions, which look similar to the following:

ActionTypeSourceTarget
_12345678_9ABC_DEF0_1234_56789ABCDEF1.uninstall1025InstallUtilManagedInstall
_FEDCBA98_7654_3210_FEDC_BA9876543210.install1025InstallUtilManagedInstall
_87654321_CBA9_0FED_4321_1FEDCBA98765.commit1537InstallUtilManagedInstall

The root of the issue is in the missing msidbCustomActionTypeNoImpersonate bit (2048) in the custom action types 1025 and 1537. You need to turn the msidbCustomActionTypeNoImpersonate bit on to let the custom actions run with a privileged token. You can manually change the type values using Orca, but a better option would be to integrate this modification in the build process.

There may be other techniques for changing MSI files programmatically, but I do it with the help of the WiRunSql.vbs script, which comes with the Windows Installer Software Development Kit (SDK). After installing the SDK, you can copy this script in the project folder and add a post-build step to update custom action types. To define a post-build step in the Visual Studio 2005 deployment (setup) project, do the following:
  1. Make sure that the Properties window is open (select the Properties Window option from the View menu if needed).
  2. Select the deployment project in Solution Explorer.
  3. In the Deployment Project Properties window, click the PostBuildEvent option, and click the ellipses button that appears on the right side of the post-build event value.
  4. In the Post-build Event Command Line dialog box, enter the following statements (make sure that each cscript statement remains on one line):

    echo Updating the MSI file...
    cscript //nologo "$(ProjectDir)WiRunSql.vbs" "$(BuiltOuputPath)" "UPDATE CustomAction SET CustomAction.Type=3073 WHERE CustomAction.Type=1025 AND CustomAction.Source='InstallUtil' AND CustomAction.Target='ManagedInstall'"
    cscript //nologo "$(ProjectDir)WiRunSql.vbs" "$(BuiltOuputPath)" "UPDATE CustomAction SET CustomAction.Type=3585 WHERE CustomAction.Type=1537 AND CustomAction.Source='InstallUtil' AND CustomAction.Target='ManagedInstall'"

    It would be better to use the bitwise OR operator to turn the msidbCustomActionTypeNoImpersonate bit on -- something like SET CustomAction.Type=CustomAction.Type|2048 -- but I could not make it work. Please be aware that if you use the hard-coded numbers shown in this example and Microsoft changes the generated values of the custom action types in future, you may need to update these queries.
  5. Click OK to close the dialog box.
Once you build the project, make sure that the post-build step succeeds. If you do not see any errors, the modified MSI file should work on Vista.

See also:
Custom Actions under UAC in Vista
How to design msi packages for Windows Vista?
Windows Vista User Account Control Step by Step Guide


*There was bug in the original code sample that came with the article. Once I discovered it (two years ago) I immediately submitted an update, but it does not seem like the publisher replaced the original sample. If you want to use it, make sure that the ParseTime24 method of the DateTimeHelper class (in the My.Utilities project) contains the following statement (notice negation):
if (!IsTime24(time))
    return false;
and not
if (IsTime24(time))
    return false;
Also, add the following line (in bold) to the WeeklyThread's Start method:
// If the execution time is in the past, increment the day.
if (nextExecutionTime < StartTime)     nextExecutionTime = nextExecutionTime.AddDays(1); // Set execution date depending on the day of the week.
NextExecutionTime = GetNextExecutionDay(nextExecutionTime, 0);


// Set default delay.
int delay = WakeUpInterval;
To get this and other updates to the code sample, download the modified project.

Monday, August 27, 2007

Repairing Windows Update

Summary: When your Windows Update stops working, try a few simple troubleshooting steps before calling Microsoft (which you can also do).

All of a sudden, Windows Update (AKA Microsoft Update) stopped working on my computer (Windows® XP SP 2). Every time I accessed the Microsoft Update Web site, I got the following error:
The site cannot continue because one or more of these Windows services is not running:
  • Automatic Updates (allows the site to find, download and install high-priority updates for your computer)
  • Background Intelligent Transfer Service (BITS) (helps updates download more quickly and without problems if the download process is interrupted)
  • Event Log (keeps a record of updating activities to help with troubleshooting, if needed)
The error message also included 11 steps to "make sure these services [were] running." I followed the instructions and restarted the services just in case. It did not help. Then I noticed the Microsoft Online Assisted Support (no-cost for Windows Update issues) link, which took me to the page showing an option to Contact a Support Professional by Email, Online, or Phone.

I signed in and submitted a support request. To my surprise, within 24 hours, I got a response with detailed troubleshooting instructions. After completing the first step, Windows Update started to work. Here are the instruction in case someone encounters the same problem.

Step 1: Register DLL files

By trying this step, we can check if the update engines are working properly.
  1. Close all instances of Internet Explorer.
  2. Select Run from the Start menu.
  3. In the Open box, type

    regsvr32 atl.dll

    and click OK (notice that there is a space between regsvr32 and atl.dll).
  4. Similarly, one by one, register the files listed below:

    regsvr32 msxml3.dll
    regsvr32 wuapi.dll
    regsvr32 wuaueng.dll
    regsvr32 wuaueng1.dll
    regsvr32 wups2.dll
    regsvr32 wucltui.dll
    regsvr32 wups.dll
    regsvr32 wuweb.dll
    regsvr32 qmgr.dll
    regsvr32 qmgrprxy.dll
    regsvr32 jscript.dll


    While registering each DLL file you should get the "succeeded" message. If you encounter any error message, you probably need to contact Microsoft.
If the issue persists, move on to step 2.

Step 2: Verify the relevant Windows Update services
  1. Select Run from the Start menu.
  2. In the Open box, type

    services.msc

    and click OK.
  3. Double-click the Automatic Updates service.
  4. Click on the Log On tab and make sure that the Local System account option is selected and the Allow service to interact with desktop option is unchecked.
  5. Check if this service has been enabled in the listed Hardware Profile; if not, click the Enable button to enable it.
  6. Click on the General tab; make sure that the Startup Type is set to Automatic. Click the Stop button under Service Status to stop the service.
  7. Click the Start button under Service Status to start the service.
  8. Please repeat the above steps with the following services:

    Background Intelligent Transfer Service
    Event Log


    The Event Log service is enabled on all of the hardware profiles. This service does not have an option to enable or disable on certain hardware profiles.
If the previous steps still do not help, proceed to step 3.

Step 3: Reload the Update temporary folders

One possible cause is that the temporary folder for Windows Update contains corrupted files. Let's erase all the files there to get the system clean.
  1. Select Run from the Start menu.
  2. In the Open box, type

    cmd

    and click OK.
  3. In the command-prompt window, enter the following command:

    net stop WuAuServ

  4. Select Run from the Start menu.
  5. In the Open box, type

    %windir%

    and click OK
  6. In the opened folder, rename the folder SoftwareDistribution to Sdold.
  7. Select Run from the Start menu.
  8. In the Open box, type

    cmd

    and click OK.
  9. In the command-prompt window, enter the following command:

    net start WuAuServ
If at this point Windows Update still does not work, you will probably need request support from Microsoft, but before you do, if you are technical enough, you may want to see if the WindowsUpdate.log file contains any suspicious errors. To open this log file in default text editor, enter its name in the Start-Run menu.

Additional references
Stealth Windows update prevents XP repair
Get the latest Windows updates securely

Thursday, August 23, 2007

Real men don't need PowerPoint

Summary: Steve Yegge explains the importance of branding at Open Source Convention 2007. And he ain't got no PowerPoint!

Imagine yourself invited to speak at a technical conference. You do your homework: pick a topic, build the slides, bring a laptop. You are ready to go, but once you get on stage, you realize that the projector does not work and tech support guys can't fix it. What do you do?

As Steve Yegge showed at OSCON 2007, you do not need PowerPoint to give an interesting speech. Sure, a couple of slides would be helpful, but they were not essential. If you want to hear Steve's perspective on the importance of branding (branding is not only relevant to major corporate brands, such as Coca-Cola, but equally applies to the work of your development team), or if you are interested in learning how other corporations handle justifiably bad brand perceptions (so that you know what to expect on the next screw-up), watch this 25-minute video (if the link does not work, try this one). As an introduction, you can also read Steve's How To Make a Funny Talk Title Without Using The Word "Weasel" post.

Additional references:
How I made my presentations a little better

Monday, August 20, 2007

Wait wait... fix this podcast!

Summary: See how you can fix unplayable or corrupted podcast files; learn how to split long podcasts into shorter segments.

Every Sunday, a local NPR station plays my favorite show Wait Wait... Don't Tell Me!. Because the 11:00 AM-12:00 PM broadcast time is rather inconvenient (for me), I subscribed to the show's podcasts. The podcasts play fine on computer, but my MP3 player cannot handle them: after playing several seconds of introduction, the player pauses briefly, then makes a loud screeching noise and moves to the next track. I tried these podcasts on other MP3 players with no luck (although the same players play podcasts of other shows just fine). After several weeks of troubleshooting, I finally determined the root cause of the problem: apparently, the MP3 player does not know how to handle a short (less than 2 seconds) silence gap that follows the introduction, so it jumps to the next track. Eventually, I figured out how to make podcasts playable on my MP3 player and more manageable. These are the steps I follow.

1. Subscribe to the podcast RSS feed (optional)
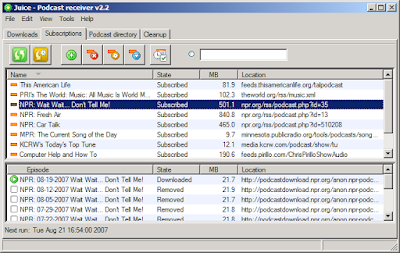
If you like a particular show, instead of looking for new podcasts yourself, you can get them via an RSS (or Atom) feed. If you computer is always turned on, you can use a desktop-based aggregator, such as Juice. The aggregator will check if any new podcasts are available for your subscriptions and download them automatically.


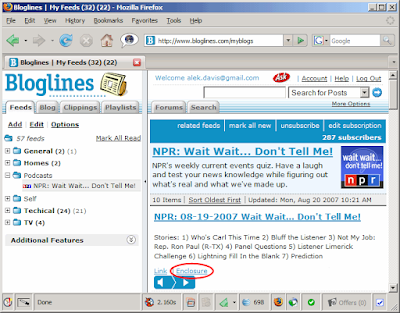
Alternatively, you can use an online aggregator, such as Bloglines, which will monitor your subscripions and display new podcasts when they become available. An online aggregator allows you to access podcast feeds from any computer, but you will need to download MP3 files yourself. When using Bloglines, click the Enclosure link to download the podcast (MP3) file.


To subscribe to a podcast show, you need to know the address of the podcast feed, which should be listed among the subscription links. For example, NPR provides a directory of available podcasts, where you can find links to such shows as NPR: Wait Wait... Don't Tell Me (http://www.npr.org/rss/podcast.php?id=35), NPR: Car Talk (http://www.npr.org/rss/podcast.php?id=510208), and others.

2. Remove silence gaps from the podcast
Once you download a podcast (MP3) file, you need to make sure that it does not contain excessive periods of silence. If you don't know any better, you can remove silence using the free Audacity tool. Notice that to use Audacity for MP3 editing (including silence removal), you have to install LAME (a popular MP3 encoder). [These instructions and screenshots apply to Audacity 1.3.2 (Beta); newer versions of the application may look differently and require different steps.]

After installing LAME, do the following (you need to do this only once):
  1. Start Audacity.
  2. Select the Edit - Preferences menu option.
  3. In the Audacity Preferences dialog box, select the File Formats option from the list box on the left side.
  4. In the MP3 Export Setup section, use the Find Library button to locate the lame_enc.dll file (this file must be in the same directory where you installed LAME, such as C:\Program Files\Lame).
  5. Make sure that the Bit Rate value in the MP3 Export Setup section is set to 64; a larger value (such as 128) will increase the size of the modified podcast files. Notice that while the 64 bit rate is good enough for podcasts, it is insufficient for music files; when using Audacity for music editing, increase the bit rate value to at least 128.

  6. Click OK, to close the Audacity Preferences dialog box.
Once you make sure that the Audacity's MP3 export settings are configured correctly, open the podcast, trim silence, and export results to an MP3 file following these steps:
  1. Open the podcast using the File - Open menu or by dragging and dropping the MP3 file onto the Audacity window (Audacity may take a minute or longer to open the file).
  2. After loading the podcast file, press CTRL+A keys to select the whole track.

  3. Select the Effect - Truncate Silence menu option.
  4. In the Truncate Silence dialog box, set the value of the Max Silent Duration (milliseconds) to 250 (you can use a slightly larger or smaller number) and click OK (truncating silence takes about one minute).

  5. If you find the volume of the podcast too low, you can increase it by selecting the Effect - Amplify menu option. Set the amplification level to the appropriate settings (use the Preview option if needed), check the Allow clipping box, and click OK (normally, you should avoid clipping in music files, but you will probably not notice its effects in podcasts). Amplification takes a couple of minutes.

  6. Once the track is ready, use the File - Export As - MP3 menu option to save the modified file. If you want, you can rename the file in the Save As dialog box or you can use the same name (I prefer to use the name of the show and the date of the broadcast in the file names, such as WaitWait_7_15_2007.mp3). Exporting to an MP3 file takes a few minutes.
At this point you will have an MP3 file which your MP3 player should be able to play. However, there is one additional step I recommend.

3. Split long podcast file into multiple MP3 files
If a podcast file is long (20 minutes or longer), you may find it more convenient to split it into shorter segments. After trying several applications which can split MP3 files, I would recommend mp3DirectCut written by Martin Pesch. [These instructions and screenshots apply to mp3DirectCut 5.02; newer versions of the application may look differently and require different steps.] To split an MP3 file using mp3DirectCut, do the following:
  1. Start mp3DirectCut.
  2. Open the podcast using the File - Open menu or by dragging and dropping the MP3 file onto the mp3DirectCut window.

  3. Select the Special - Auto Cue menu option.
  4. In the Auto Cue dialog box, define the length of the segments into which you want to split the podcast (10 minutes is a reasonable value) and click OK.

  5. Select the File - Save Split menu option.
  6. In the Split file dialog box, define the format of the names of the generated track files in the Filename creation field. I use the %F (%N) format to append sequence numbers to the original file name, but you can use a different naming convention. You may also want to change the destination folder where the files will be saved, e.g. directly to your MP3 player. Click OK to start splitting the file (splitting takes about one minute).

I realize that the process may seem a bit tedious, so if you have recommendations how to improve or simplify it, please submit them via comments.

Additional references:
MP3 encoding primer

UPDATE: Since switching to Zune, I have pretty much abandoned the process described in this post. Both the Zune device and software (after the latest update) have been excellent tools for subscribing, managing, and listening to podcasts. I'm not sure if other media players offer the same podcasting capabilities, but if not, I would highly recommend Zune for its excellent features. (Note: This is not a paid advertisement.)