Monday, August 27, 2007

Repairing Windows Update

Summary: When your Windows Update stops working, try a few simple troubleshooting steps before calling Microsoft (which you can also do).

All of a sudden, Windows Update (AKA Microsoft Update) stopped working on my computer (Windows® XP SP 2). Every time I accessed the Microsoft Update Web site, I got the following error:
The site cannot continue because one or more of these Windows services is not running:
  • Automatic Updates (allows the site to find, download and install high-priority updates for your computer)
  • Background Intelligent Transfer Service (BITS) (helps updates download more quickly and without problems if the download process is interrupted)
  • Event Log (keeps a record of updating activities to help with troubleshooting, if needed)
The error message also included 11 steps to "make sure these services [were] running." I followed the instructions and restarted the services just in case. It did not help. Then I noticed the Microsoft Online Assisted Support (no-cost for Windows Update issues) link, which took me to the page showing an option to Contact a Support Professional by Email, Online, or Phone.

I signed in and submitted a support request. To my surprise, within 24 hours, I got a response with detailed troubleshooting instructions. After completing the first step, Windows Update started to work. Here are the instruction in case someone encounters the same problem.

Step 1: Register DLL files

By trying this step, we can check if the update engines are working properly.
  1. Close all instances of Internet Explorer.
  2. Select Run from the Start menu.
  3. In the Open box, type

    regsvr32 atl.dll

    and click OK (notice that there is a space between regsvr32 and atl.dll).
  4. Similarly, one by one, register the files listed below:

    regsvr32 msxml3.dll
    regsvr32 wuapi.dll
    regsvr32 wuaueng.dll
    regsvr32 wuaueng1.dll
    regsvr32 wups2.dll
    regsvr32 wucltui.dll
    regsvr32 wups.dll
    regsvr32 wuweb.dll
    regsvr32 qmgr.dll
    regsvr32 qmgrprxy.dll
    regsvr32 jscript.dll


    While registering each DLL file you should get the "succeeded" message. If you encounter any error message, you probably need to contact Microsoft.
If the issue persists, move on to step 2.

Step 2: Verify the relevant Windows Update services
  1. Select Run from the Start menu.
  2. In the Open box, type

    services.msc

    and click OK.
  3. Double-click the Automatic Updates service.
  4. Click on the Log On tab and make sure that the Local System account option is selected and the Allow service to interact with desktop option is unchecked.
  5. Check if this service has been enabled in the listed Hardware Profile; if not, click the Enable button to enable it.
  6. Click on the General tab; make sure that the Startup Type is set to Automatic. Click the Stop button under Service Status to stop the service.
  7. Click the Start button under Service Status to start the service.
  8. Please repeat the above steps with the following services:

    Background Intelligent Transfer Service
    Event Log


    The Event Log service is enabled on all of the hardware profiles. This service does not have an option to enable or disable on certain hardware profiles.
If the previous steps still do not help, proceed to step 3.

Step 3: Reload the Update temporary folders

One possible cause is that the temporary folder for Windows Update contains corrupted files. Let's erase all the files there to get the system clean.
  1. Select Run from the Start menu.
  2. In the Open box, type

    cmd

    and click OK.
  3. In the command-prompt window, enter the following command:

    net stop WuAuServ

  4. Select Run from the Start menu.
  5. In the Open box, type

    %windir%

    and click OK
  6. In the opened folder, rename the folder SoftwareDistribution to Sdold.
  7. Select Run from the Start menu.
  8. In the Open box, type

    cmd

    and click OK.
  9. In the command-prompt window, enter the following command:

    net start WuAuServ
If at this point Windows Update still does not work, you will probably need request support from Microsoft, but before you do, if you are technical enough, you may want to see if the WindowsUpdate.log file contains any suspicious errors. To open this log file in default text editor, enter its name in the Start-Run menu.

Additional references
Stealth Windows update prevents XP repair
Get the latest Windows updates securely
Thursday, August 23, 2007

Real men don't need PowerPoint

Summary: Steve Yegge explains the importance of branding at Open Source Convention 2007. And he ain't got no PowerPoint!

Imagine yourself invited to speak at a technical conference. You do your homework: pick a topic, build the slides, bring a laptop. You are ready to go, but once you get on stage, you realize that the projector does not work and tech support guys can't fix it. What do you do?

As Steve Yegge showed at OSCON 2007, you do not need PowerPoint to give an interesting speech. Sure, a couple of slides would be helpful, but they were not essential. If you want to hear Steve's perspective on the importance of branding (branding is not only relevant to major corporate brands, such as Coca-Cola, but equally applies to the work of your development team), or if you are interested in learning how other corporations handle justifiably bad brand perceptions (so that you know what to expect on the next screw-up), watch this 25-minute video (if the link does not work, try this one). As an introduction, you can also read Steve's How To Make a Funny Talk Title Without Using The Word "Weasel" post.

Additional references:
How I made my presentations a little better

Monday, August 20, 2007

Wait wait... fix this podcast!

Summary: See how you can fix unplayable or corrupted podcast files; learn how to split long podcasts into shorter segments.

Every Sunday, a local NPR station plays my favorite show Wait Wait... Don't Tell Me!. Because the 11:00 AM-12:00 PM broadcast time is rather inconvenient (for me), I subscribed to the show's podcasts. The podcasts play fine on computer, but my MP3 player cannot handle them: after playing several seconds of introduction, the player pauses briefly, then makes a loud screeching noise and moves to the next track. I tried these podcasts on other MP3 players with no luck (although the same players play podcasts of other shows just fine). After several weeks of troubleshooting, I finally determined the root cause of the problem: apparently, the MP3 player does not know how to handle a short (less than 2 seconds) silence gap that follows the introduction, so it jumps to the next track. Eventually, I figured out how to make podcasts playable on my MP3 player and more manageable. These are the steps I follow.

1. Subscribe to the podcast RSS feed (optional)
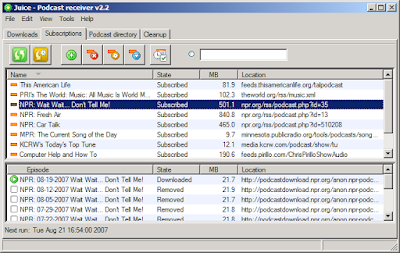
If you like a particular show, instead of looking for new podcasts yourself, you can get them via an RSS (or Atom) feed. If you computer is always turned on, you can use a desktop-based aggregator, such as Juice. The aggregator will check if any new podcasts are available for your subscriptions and download them automatically.


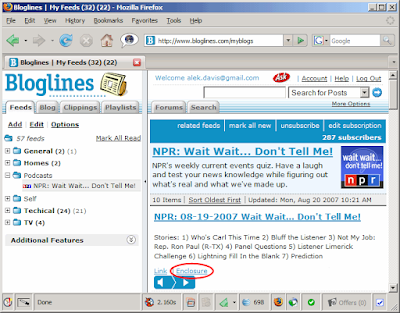
Alternatively, you can use an online aggregator, such as Bloglines, which will monitor your subscripions and display new podcasts when they become available. An online aggregator allows you to access podcast feeds from any computer, but you will need to download MP3 files yourself. When using Bloglines, click the Enclosure link to download the podcast (MP3) file.


To subscribe to a podcast show, you need to know the address of the podcast feed, which should be listed among the subscription links. For example, NPR provides a directory of available podcasts, where you can find links to such shows as NPR: Wait Wait... Don't Tell Me (http://www.npr.org/rss/podcast.php?id=35), NPR: Car Talk (http://www.npr.org/rss/podcast.php?id=510208), and others.

2. Remove silence gaps from the podcast
Once you download a podcast (MP3) file, you need to make sure that it does not contain excessive periods of silence. If you don't know any better, you can remove silence using the free Audacity tool. Notice that to use Audacity for MP3 editing (including silence removal), you have to install LAME (a popular MP3 encoder). [These instructions and screenshots apply to Audacity 1.3.2 (Beta); newer versions of the application may look differently and require different steps.]

After installing LAME, do the following (you need to do this only once):
  1. Start Audacity.
  2. Select the Edit - Preferences menu option.
  3. In the Audacity Preferences dialog box, select the File Formats option from the list box on the left side.
  4. In the MP3 Export Setup section, use the Find Library button to locate the lame_enc.dll file (this file must be in the same directory where you installed LAME, such as C:\Program Files\Lame).
  5. Make sure that the Bit Rate value in the MP3 Export Setup section is set to 64; a larger value (such as 128) will increase the size of the modified podcast files. Notice that while the 64 bit rate is good enough for podcasts, it is insufficient for music files; when using Audacity for music editing, increase the bit rate value to at least 128.

  6. Click OK, to close the Audacity Preferences dialog box.
Once you make sure that the Audacity's MP3 export settings are configured correctly, open the podcast, trim silence, and export results to an MP3 file following these steps:
  1. Open the podcast using the File - Open menu or by dragging and dropping the MP3 file onto the Audacity window (Audacity may take a minute or longer to open the file).
  2. After loading the podcast file, press CTRL+A keys to select the whole track.

  3. Select the Effect - Truncate Silence menu option.
  4. In the Truncate Silence dialog box, set the value of the Max Silent Duration (milliseconds) to 250 (you can use a slightly larger or smaller number) and click OK (truncating silence takes about one minute).

  5. If you find the volume of the podcast too low, you can increase it by selecting the Effect - Amplify menu option. Set the amplification level to the appropriate settings (use the Preview option if needed), check the Allow clipping box, and click OK (normally, you should avoid clipping in music files, but you will probably not notice its effects in podcasts). Amplification takes a couple of minutes.

  6. Once the track is ready, use the File - Export As - MP3 menu option to save the modified file. If you want, you can rename the file in the Save As dialog box or you can use the same name (I prefer to use the name of the show and the date of the broadcast in the file names, such as WaitWait_7_15_2007.mp3). Exporting to an MP3 file takes a few minutes.
At this point you will have an MP3 file which your MP3 player should be able to play. However, there is one additional step I recommend.

3. Split long podcast file into multiple MP3 files
If a podcast file is long (20 minutes or longer), you may find it more convenient to split it into shorter segments. After trying several applications which can split MP3 files, I would recommend mp3DirectCut written by Martin Pesch. [These instructions and screenshots apply to mp3DirectCut 5.02; newer versions of the application may look differently and require different steps.] To split an MP3 file using mp3DirectCut, do the following:
  1. Start mp3DirectCut.
  2. Open the podcast using the File - Open menu or by dragging and dropping the MP3 file onto the mp3DirectCut window.

  3. Select the Special - Auto Cue menu option.
  4. In the Auto Cue dialog box, define the length of the segments into which you want to split the podcast (10 minutes is a reasonable value) and click OK.

  5. Select the File - Save Split menu option.
  6. In the Split file dialog box, define the format of the names of the generated track files in the Filename creation field. I use the %F (%N) format to append sequence numbers to the original file name, but you can use a different naming convention. You may also want to change the destination folder where the files will be saved, e.g. directly to your MP3 player. Click OK to start splitting the file (splitting takes about one minute).

I realize that the process may seem a bit tedious, so if you have recommendations how to improve or simplify it, please submit them via comments.

Additional references:
MP3 encoding primer

UPDATE: Since switching to Zune, I have pretty much abandoned the process described in this post. Both the Zune device and software (after the latest update) have been excellent tools for subscribing, managing, and listening to podcasts. I'm not sure if other media players offer the same podcasting capabilities, but if not, I would highly recommend Zune for its excellent features. (Note: This is not a paid advertisement.)